Model-driven apps in PowerApps: Site Map
Welcome to the third article in the model-driven app series! Today we will look at the Site Map and understand how it works from the back end / system administrator view and how that translates to the front end / end user view. This series includes six articles that will help you to get to know and use model-driven apps and PowerApps:
This is the single most important component of your model-driven app. It controls which areas of Dynamics 365 are accessible in your App. When building your app, you will have two options when it comes to a site map:
- Use existing (from a solution)
- Create new
Your map consists of three components:
- Area
- Group
- Subarea
Let’s first look at these three components from the back end view for System Administrators and app builders:
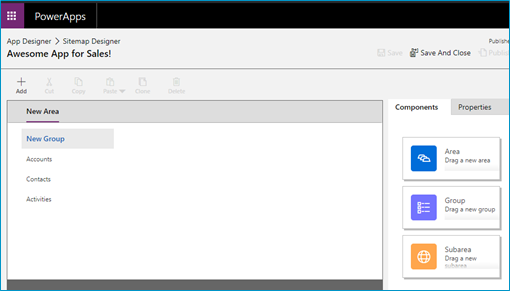
Utilizing a simple drag and drop interface (similar to what you see when building Business Rules and Business Process Flows), you can add new Areas, Groups and Subareas to your Sitemap Designer. But what do these mean to the end user? What is the difference between the three components and how do they display?
To best understand the difference between an area, group and subarea on the Sitemap Designer, let’s take a look at the end user / front end view of the sitemap:

Take a look at the image above to understand how the site map displays to users. The table below will explain how the highlighted colors relate to the Sitemap Designer.
| Highlight color | Sitemap Designer Detail |
| Blue | Area |
| Green | Group |
| Yellow | Subarea |
Now that you understand what each component is, build out your app’s sitemap. Once you have completed the build, make sure to Save it by clicking the Save icon in the top right-hand corner of the Sitemap Designer. Next, click Publish.
After your site map has been saved and published, it’s time to move on to the fun stuff – adding components and setting properties. Stay tuned for the next article in our series, where we dive into components (entities, dashboards, business process flows and more)!
Need Help?
Do you need help planning your Site Map? Feel free to reach out to reenhanced! Fill out our Contact Form with details about what you’re working on, or email me directly at [email protected]. Happy building!