Building a Custom Connector: Using Multiple x-ms-dynamic-values Dropdowns
Power Automate and Logic Apps allow less technical people to work with complex systems without having to understand their inner workings.
Organizations around the world use these tools to glue together different services in a centrally managed way so business operations are stored in a known place away from the technical implementation. When properly managed, the entire team can understand how the business works and can operate with the efficiency of a small smart startup.
Custom connectors allow you to bring your own software tools and systems inside Power Automate and Logic Apps to become pieces of this bigger picture. For the most part, these connectors are easy to build but it can get complex with dynamic data. Today we’ll explore some of Microsoft’s dynamic data extensions to the OpenAPI specification. Hold on to your hat, this blog will get technical and then walk backwards to give you a clear picture of how these things work.
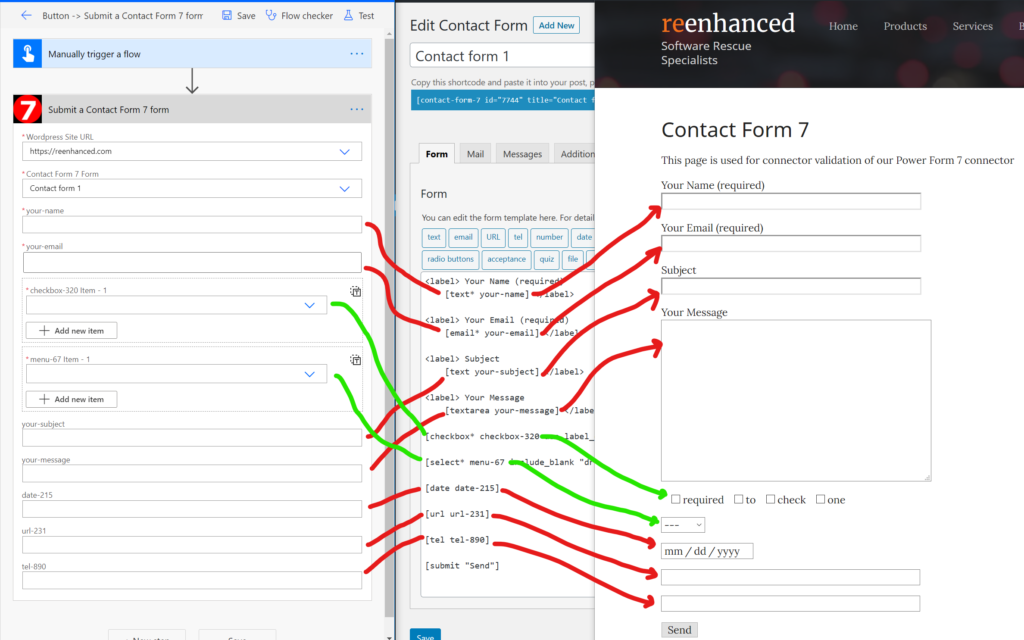
When you’re building a custom connector sometimes you need user input to build the request correctly. As shown above, in our Power Form 7 connector, users are able to submit Contact Form 7 forms using our connector. By allowing the users to manage the contact form in an interface they know (and love?) they can design forms to their heart’s content and our connector will happily connect their data to Power Automate and Logic Apps.
The way this is done is through what Microsoft calls Dynamic Values. In other words, it’s impossible for our connector to know what type of request to build until after the user supplies necessary data about what they want to submit.
In order to get the schema for our custom connector, we need the user to identify which site url, and then which form they’ll be submitting. By reading this article, you’ll learn how to build requests with one or many dependent connectors! (From this point forward we assume you’re familiar with the basic OpenAPI v2 specification.)
Below is a nearly complete example of how you can use dependent parameters in your API. You can copy/paste this into the paths and parameters section of your Swagger Editor and modify to your needs. Then read on for a breakdown of how all the pieces fit together. Note that our example uses a dynamic schema, but we won’t be covering that portion in today’s blog.
parameters:
  siteurl__in_header:
    x-ms-summary: WordPress Site URL
    x-ms-dynamic-values: {operationId: GetDomains, value-path: name, value-title: name}
    required: true
    in: header
    name: siteurl
    description: Select the site from this dropdown
    x-ms-visibility: important
    type: string
  form_id__in_path:
    x-ms-summary: Contact Form 7 form
    x-ms-dynamic-values:
      parameters:
        siteurl: {parameter: siteurl}
      operationId: GetForms
      value-path: id
      value-title: title
    required: true
    in: path
    name: form_id
    description: Select Contact Form 7 form from this dropdown
    x-ms-visibility: important
    x-ms-url-encoding: single
    type: string
paths:
  /domains:
    get:
      summary: (private) Get list of domains
      produces: [application/json]
      responses:
        '200':
          schema:
            items:
              type: object
              properties:
                name: {type: string}
                id: {format: int32, type: integer}
            type: array
          description: List of forms
      x-ms-visibility: internal
      operationId: GetDomains
      description: Returns licensed domains
  /forms:
    get:
      summary: (private) Get Contact Form 7 forms
      responses:
        '200':
          schema:
            items:
              type: object
              properties:
                slug: {type: string, description: slug}
                locale: {type: string, description: locale}
                id: {format: int32, type: integer, description: id}
                title: {x-ms-summary: Form Name, type: string, description: title}
            type: array
          description: '200'
        '403':
          schema: {}
          description: Unauthorized
      parameters:
      - {$ref: '#/parameters/siteurl__in_header'}
      x-ms-visibility: internal
      operationId: GetCF7Forms
      description: Gets a list of all Contact Form 7 forms
  /forms/{form_id}:
    get:
      summary: (private) Retrieve form schema
      responses:
        '200': {description: Note we do not have to specify the response!}
        '403':
          schema: {}
          description: Unauthorized
      parameters:
      - {$ref: '#/parameters/siteurl__in_header'}
      - {$ref: '#/parameters/form_id__in_path'}
      x-ms-visibility: internal
      operationId: GetFormSchema
      description: Returns the schema for the specified form
  /{form_id}/submit:
    post:
      summary: Submit a Contact Form
      responses:
        '200': {description: OK}
      parameters:
      - {$ref: '#/parameters/siteurl__in_header'}
      - {$ref: '#/parameters/form_id__in_path'}
      - required: true
		name: query
		in: body
        schema:
		  x-ms-dynamic-properties:
			itemValuePath: schema
			parameters:
			  form_id: {parameterReference: form_id}
			  siteurl: {parameterReference: siteurl}
			operationId: GetFormSchema
		  x-ms-dynamic-schema:
			parameters:
			  form_id: {parameter: form_id}
			  siteurl: {parameter: siteurl}
			operationId: GetFormSchema
			value-path: schema
		  type: object
		  properties: {}
      x-ms-visibility: important
      operationId: SubmitForm
description: Submit a Contact Form 7 formThe YAML above exposes a single action “Submit a Contact Form 7 form” that looks like this:
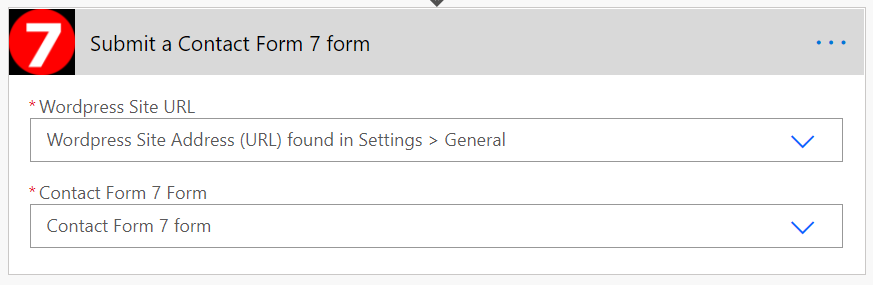
However this small connector hides a surprising amount of functionality. Let’s explore.
The way this API works is as follows:
- Authorize against the API (Not covered here)
- Choose which Site URL you want to work with. This is a list of all sites with our plugin installed.
- From the site you’ve selected, choose the form that you want to submit.
- Fill in the parameters for the form in Power Automate.
- When your flow runs, the form is submitted
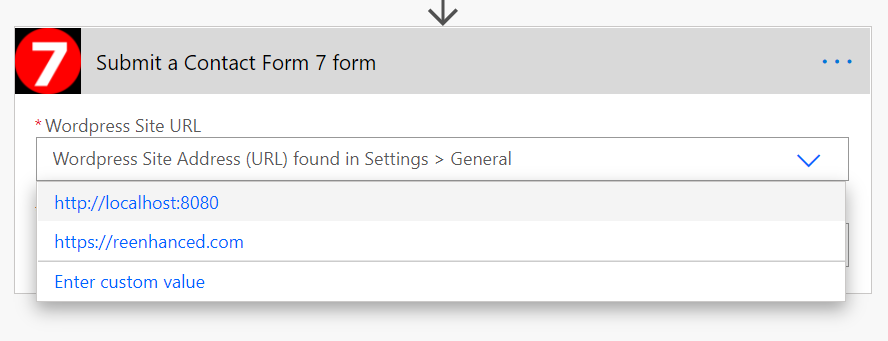
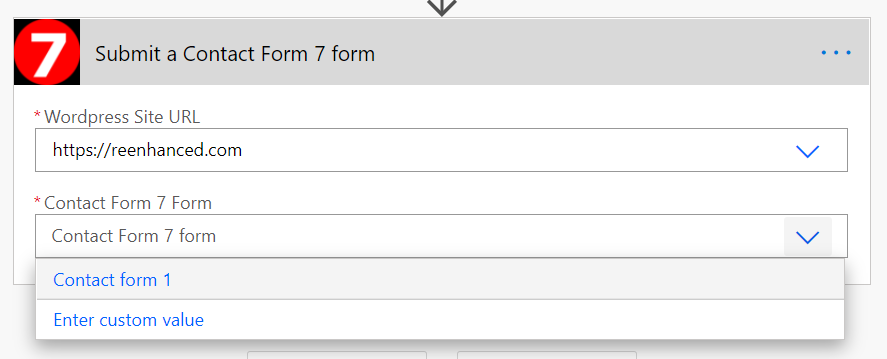
When you click on the drop-down to select Site URL, you’ll see a list of all the sites with the plugin installed:
After you select a site, you’ll see a list of all forms for the site you selected:
Finally, once you select a form, the magic happens. The Dynamic Schema returns all of the information you need to populate the form, including pre-populating selectable options:
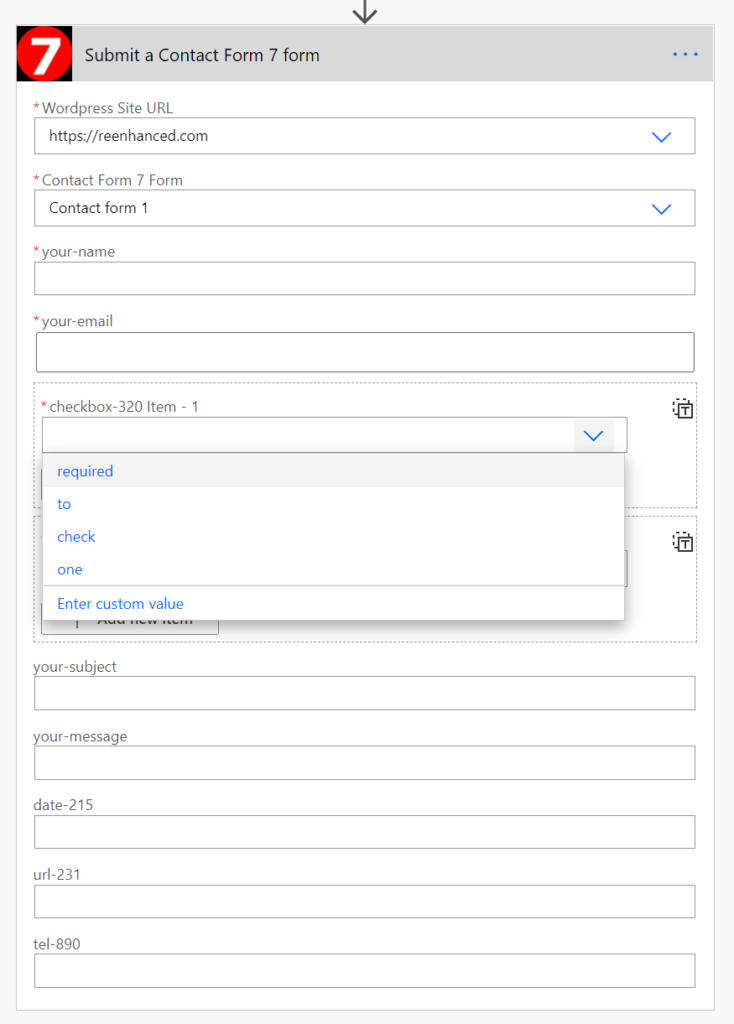
As you can see, there’s quite a bit that can be done from this connector. By allowing all of the form administration to happen on the Contact Form 7 side, users can manage the systems from interfaces they’re comfortable with and never have to see or think about the internals of what Power Form 7 is providing.
So let’s look at how to do this for your own API.
The best way to help you understand how this works is to look at the operation object that Power Automate is using to display this action:
  /forms/{form_id}/submit:
    post:
      summary: Submit a Contact Form 7 form
      consumes: [multipart/form-data]
      responses:
        '200': {description: OK}
      parameters:
      - {$ref: '#/parameters/siteurl__in_header'}
      - {$ref: '#/parameters/form_id__in_path'}
      - required: true
        schema:
          x-ms-dynamic-properties:
            itemValuePath: schema
            parameters:
              form_id: {parameterReference: form_id}
              siteurl: {parameterReference: siteurl}
            operationId: GetFormSchema
          x-ms-dynamic-schema:
            parameters:
              form_id: {parameter: form_id}
              siteurl: {parameter: siteurl}
            operationId: GetFormSchema
            value-path: schema
          type: object
          properties: {}
        description: Form data
        in: body
        name: query
	  x-ms-visibility: important
      operationId: SubmitForm
      description: Use this action to submit a Contact Form 7 form
This operation is visible as an action for this connector because of x-ms-visibility: important which Power Automate / Logic Apps uses to determine visibility. If you look carefully at the full code, you’ll see every other operation is marked as “internal” which means they won’t appear in the list. The summary field is used to determine the name used by Power Automate.
As you can see, this API call requires 3 parameters: query, siteurl__in_header, and form_id__in_path. But how does Power Automate know the order in which to display them? How does it know some of these can be selected from a dropdown? How does it ?
Let’s explore each parameter in depth.
In order to fully understand the way this works let’s unwrap the references in the YAML so we can see this action the same way that Power Automate does. All we’ve done below is copy/paste each reference from where it was implemented directly into the path object.
  /forms/{form_id}/submit:
    post:
      summary: Submit a Contact Form 7 form
      consumes: [multipart/form-data]
      responses:
        '200': {description: OK}
      parameters:
      - name: siteurl
		in: header
		x-ms-summary: WordPress Site URL
		description: WordPress Site Address (URL) found in Settings > General
		x-ms-dynamic-values: {operationId: GetDomains, value-path: name, value-title: name}
		required: true
		x-ms-visibility: important
		type: string
      - name: form_id
		in: path
		description: Contact Form 7 form
		x-ms-summary: Contact Form 7 Form
		x-ms-dynamic-values:
		  parameters:
			siteurl: {parameter: siteurl}
		  operationId: GetCF7Forms
		  value-path: id
		  value-title: title
		required: true
		x-ms-visibility: important
		x-ms-url-encoding: single
		type: string
      - name: query
		in: body
		description: Form data
		required: true
        schema:
          x-ms-dynamic-properties:
            itemValuePath: schema
            parameters:
              form_id: {parameterReference: form_id}
              siteurl: {parameterReference: siteurl}
            operationId: GetFormSchema
          x-ms-dynamic-schema:
            parameters:
              form_id: {parameter: form_id}
              siteurl: {parameter: siteurl}
            operationId: GetFormSchema
            value-path: schema
          type: object
          properties: {}
	  x-ms-visibility: important
      operationId: SubmitForm
      description: Use this action to submit a Contact Form 7 form
With this “exploded” view the way this works becomes a little bit more clear. (I reordered the parameters slightly so you can find the name quickly.)
When Power Automate reads this spec, it scans the parameters. Here there are three parameters:
- A
headerparameter namedsiteurlwith ax-ms-dynamic-valuesfield - A
pathparameter namedform_idwith ax-ms-dynamic-valuesfield that itself requires a parameter namedsiteurl - A
bodyparameter namedquerywith aschemacontainingx-ms-dynamic-schemaandx-ms-dynamic-properties
Clearly there’s a relationship between these parameters. The diagram below shows how they’re connected.
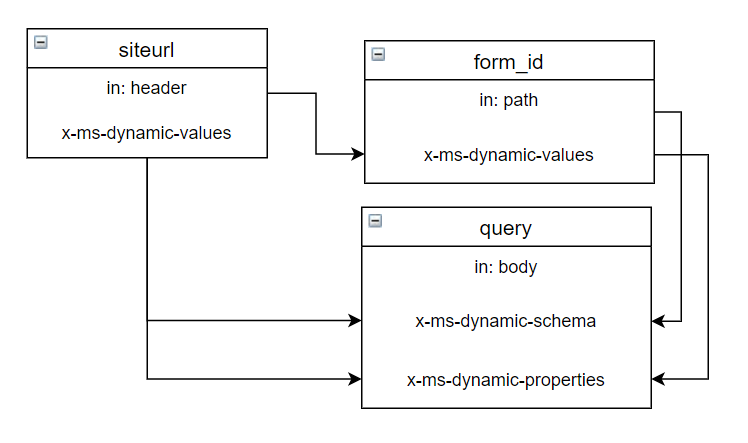
If you stare at this image long enough, you’ll see the following:
- In order to fill in
query, you need to knowsiteurlandform_id - In order to get
form_id, you need to knowsiteurl - You don’t need anything to get
siteurl
With the order that these requests now known (because of the dependency graph) we can look at each request to see how Power Automate makes it work. We’ll start with the siteurl parameter for our action.
- x-ms-summary: WordPress Site URL
  x-ms-dynamic-values: {operationId: GetDomains, value-path: name, value-title: name}
  required: true
  in: header
  name: siteurl
  description: WordPress Site Address (URL) found in Settings > General
  x-ms-visibility: important
  type: string
This parameter object uses the x-ms-dynamic-values field to describe where the possible values for this come from. This object references another operation, so let’s examine that here as well.
/domains:
  get:
	summary: (private) Get list of domains
	produces: [application/json]
	responses:
	  '200':
		schema:
		  items:
			type: object
			properties:
			  name: {type: string}
			  id: {format: int32, type: integer}
		  type: array
		description: List of forms
	x-ms-visibility: internal
	operationId: GetDomains
	description: Returns licensed domains
As you can see, this path object doesn’t require any parameters and the described schema is listed here. Here is an example of what this request actually produces.
[
    {
        "id": 11,
        "name": "https://reenhanced.com"
    },
    {
        "id": 12,
        "name": "http://localhost:8080"
    }
]
Now let’s pull all of this together.
Any action or trigger that has includes the parameter above, with the x-ms-dynamic-values field, will show a drop-down like the following:
This drop-down calls the operationId specified by the x-ms-dynamic-values and uses the value-title to populate the human readable titles which will translate to the field specified by value-path. When a user selects a value from this dropdown, the parameter is assigned the value determined by value-path. (In other words, if our x-ms-dynamic-values looked like this x-ms-dynamic-values: {operationId: GetDomains, value-path: id, value-title: name} then when I select the localhost address my parameter would be assigned a value of 11. (Study the response from GET /domains to see how id and name connect to the data and value submitted from the dropdown.)
🥳🎈 Yay! We got a value for siteurl using x-ms-dynamic-values! This means we can use this in our parameter to get form_id and we can use it in our dynamic schema call too!
Now that you understand how dependencies work, know that Power Automate and Logic Apps allow you to make them dependent upon each other. Let’s see how to do that.
Now that we’ve know the value for the siteurl parameter (which happens to be the same as the human-readable value in our case) we see how the dependency graph has changed.
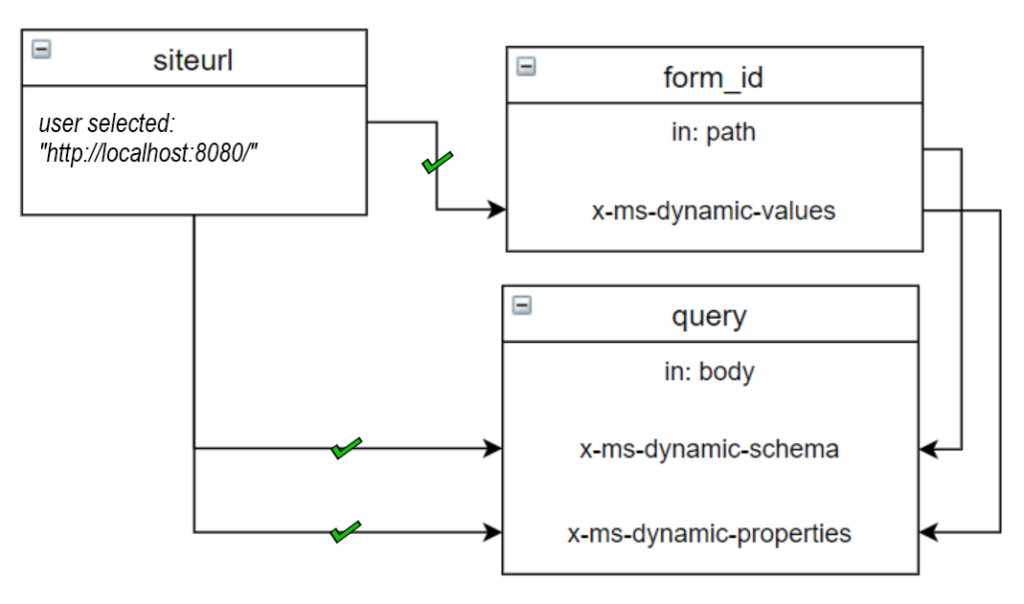
Let’s look at what this means for the form_id parameter:
      - name: form_id
		in: path
		description: Contact Form 7 form
		x-ms-summary: Contact Form 7 Form
		x-ms-dynamic-values:
		  parameters:
			siteurl: {parameter: siteurl}
		  operationId: GetCF7Forms
		  value-path: id
		  value-title: title
		required: true
		x-ms-visibility: important
		x-ms-url-encoding: single
		type: string
As you can see, in order for the x-ms-dynamic-values operation to run it needs the siteurl parameter, which we now have. So Power Automate / Logic Apps can now execute the operation GetCF7Forms which we see below (If you recall, this is implemented as a x-ms-visibility: internal path object included in our spec.)
  /forms:
    get:
      summary: (private) Get Contact Form 7 forms
      responses:
        '200':
          schema:
            items:
              type: object
              properties:
                slug: {type: string, description: slug}
                locale: {type: string, description: locale}
                id: {format: int32, type: integer, description: id}
                title: {x-ms-summary: Form Name, type: string, description: title}
            type: array
          description: '200'
        '403':
          schema: {}
          description: Unauthorized
      parameters:
      - {$ref: '#/parameters/siteurl__in_header'}
      x-ms-visibility: internal
      operationId: GetCF7Forms
      description: Gets a list of all Contact Form 7 forms
The path object above describes the request that Power Automate performs in the background that executes the moment you click on the dropdown to select a form. Since we have a value for siteurl it can make this request which gives us back a response described by the schema.
Back inside the parameter for our exposed API call, the x-ms-dynamic-values object will render the dropdown with the title shown to the users, but will set form_id to the id, this is due to the value-path: id and value-title: title settings.
Once the user selects a form_id, the x-ms-dynamic-schema request can be made! This request will reach out to the server which must respond with a schema object just like you’d see in any other specification. Watch for our next blog post for full details on how Dynamic Schema works.
Until then, we’ll leave you with a preview of how all of it is connected.