Let’s Write a Flow: Create a Lead from Gravity Forms Submission

The top use case we see for the Gravity Forms Power Automate connector is to create a lead from Gravity Forms.
Many organizations use a form on their website to send lead details to a sales team. Oftentimes, it arrives via email from Gravity Forms. From there, it is forwarded to the appropriate sales rep who acts on it, and hopefully enters it into a CRM system for tracking and forecasting.
Implementing a simple automation for lead processing can allow these Gravity Form submissions to be tracked, providing excellent ROI to your marketing team. Moreover, this automation will make sure the sales team receives a lead so they can act on it quickly and win the deal.
Below, we will walk through a simple example of how to build a flow with the following trigger and action:
When a Gravity Forms form is submitted, create a new lead in my CRM system with the values entered on the form.
Connectors in this Flow
We’ll be using two connectors in this simple flow:
- Gravity Forms (the most popular form solution for WordPress) – you’ll need your license key available when configuring your flow’s trigger.
- Dataverse (though, you can use any CRM connector you need – see a list of available CRM connectors in Power Automate here.)
Prerequisites Before Building This Flow
You’ll need to have a form already built in Gravity Forms. It can be as simple or as complex as you’d like.
You’ll also need some sort of database to capture the form submission as a lead. In this example, we will use Dataverse for a Dynamics 365 system. But, you can use anything you’d like.
Overview of the Process
When we plan out our flow, here are the steps we will take:
- Using the Gravity Forms Power Automate trigger When a Gravity Forms Form is Submitted, we kick off our automated cloud flow.
- Using the Microsoft Dataverse action Add a new row, we will add a new Lead to a Dynamics 365 system.
Step 1: Configure Gravity Forms by Reenhanced Connection
Type in a connection name, and enter the License Key that was emailed to you after purchasing the product (which you can do here – use promo code to get one month free to try it out!)

After you create this, it will authenticate your license key and get all of the Gravity Forms forms that you have available. Once that comes through, you will have a list of all of your forms.

Step 2: Add a trigger
For our trigger, we add When a Form is Submitted from Gravity Forms. Select the form from Gravity Forms / WordPress for the flow:

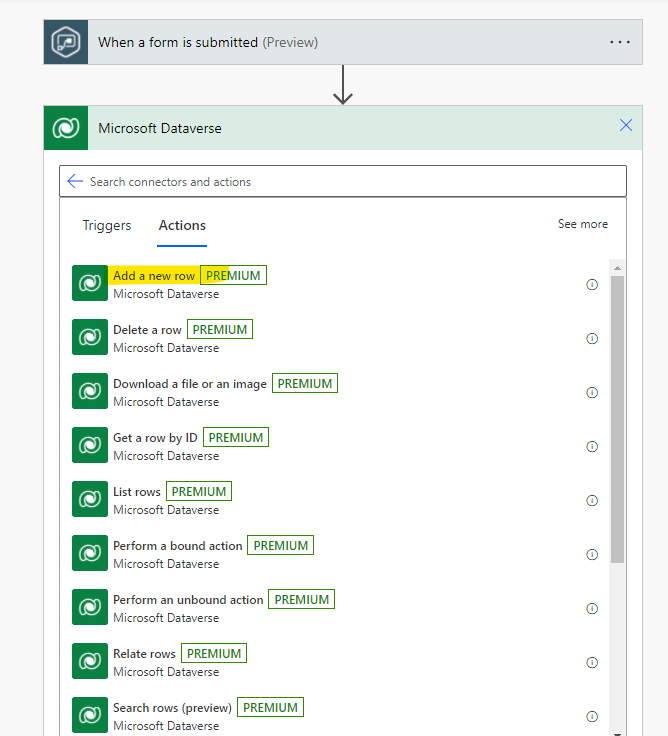
Step 2: Add an action
Next, we want to add an action by clicking the + New step button in the screen shot above.
Navigate to the Microsoft Dataverse connector, then select Add a new row.
NOTE: You may have to log into Microsoft Dataverse and create a connection if you haven’t used it before.
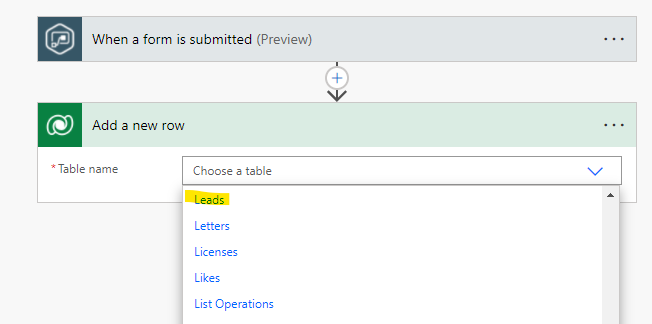
Next, you’ll need to select the table. In this example, we want the Lead table.
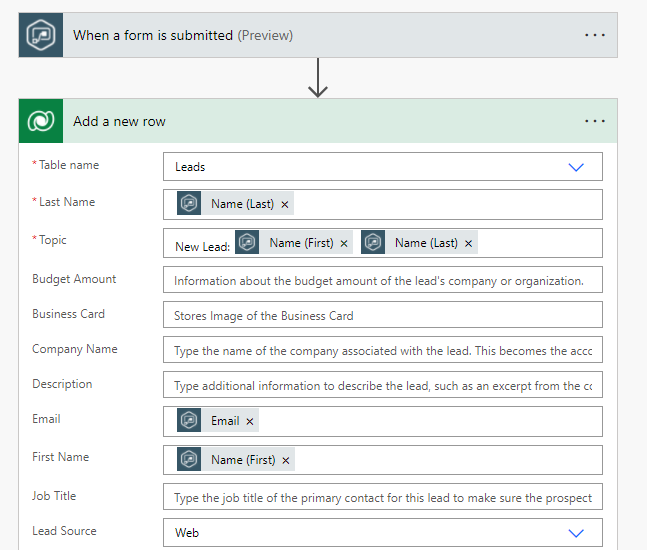
Step 3: Map your values in your action
Once you select a table, you can map the columns for the selected table with values entered in your form, or selecting hard-coded values (like Lead Source = Web in this example):
Once that is done, you can run a test to make sure you can create a lead from Gravity Forms.
Step 4: Save, Run Flow Checker & Test!
Now that you have added all actions to this automated cloud flow, it’s time to Save, run the Flow Checker and Test your flow to make sure it’s working as expected! Happy building! If you have questions or need help, feel free to reach out and email me at [email protected].